
A Polaris pool cleaner typically stops working effectively due to worn drive wheels, clogged filtration bags, or damaged sweep hoses. Understanding how to repair polaris pool cleaner systems involves identifying these specific mechanical failures and replacing the corresponding components. Most pressure-side and suction-side models rely on simple mechanical parts that degrade over time from pool chemicals and physical friction.
Many owners find that a complete rebuild kit offers the most cost-effective solution for older units. These kits usually include wheels, bearings, and hoses that match the original equipment manufacturer specifications. By addressing these issues, you can extend the life of your cleaner and maintain consistent water clarity without the expense of a new machine. The following sections detail the specific parts and procedures involved in restoring these units.


Repairing a Polaris cleaner requires identifying the specific model and the nature of the failure.
- Most issues stem from the drive mechanism, the filtration system, or the plumbing connections.
- Before disassembling the unit, you should confirm that the pool pump is functioning correctly and that the water pressure is adequate.
- A weak pump flow can mimic the symptoms of a broken cleaner, leading to unnecessary repairs.
- Always disconnect the cleaner from the pool plumbing before starting any work.
| Component | Common Failure Symptom | Typical Replacement Part |
|---|---|---|
| Drive Wheels | Slipping on pool floor, uneven movement | Wheel and Tire Set |
| Turbine Bearings | Grinding noise, reduced suction | Turbine Bearing Kit |
| Sweep Hose | Cracks, leaks, poor water flow | Sweep Hose and Scrubber |
| Filter Bag | Clogged, torn, or ineffective filtration | All-Purpose Filter Bag |
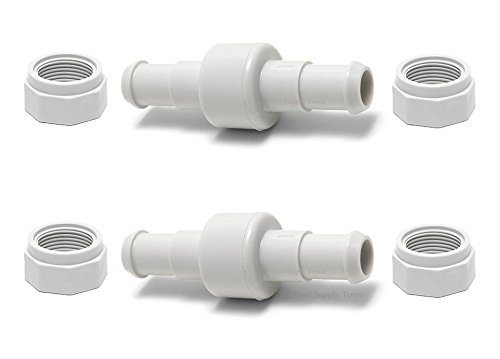
| Wall Fitting | Leaks at connection point, pressure loss | UWF Connector Assembly |
Start by inspecting the external components for visible damage, looking for cracks in the plastic housing, worn-out tires, or frayed hoses.
- The drive wheels are often the first point of failure, especially in pools with rough surfaces.
- If the wheels are slipping or the cleaner is not moving in a consistent pattern, the tires likely need replacement.
- A complete rebuild kit is often the best approach for this task, as it ensures all moving parts are replaced simultaneously.
Check the filtration bag for tears or excessive clogging. A clogged bag reduces suction and can cause the cleaner to stall. If the bag is torn, replace it immediately to prevent debris from entering the pump system. The bag should be rinsed thoroughly after every use to maintain optimal performance. Regular cleaning of the filter basket is essential for preventing long-term damage to the unit.
Inspect the sweep hose for cracks or kinks. The hose connects the cleaner to the pool plumbing and must remain flexible to allow proper water flow. A cracked hose will leak water and reduce the vacuum power of the cleaner. Replace the hose if you see any signs of wear or brittleness. The tail scrubber at the end of the hose also wears down over time and should be replaced if it is frayed or missing.
Examine the wall fitting and connector assembly for leaks. This component connects the cleaner to the pool’s return line and must be secure to maintain pressure. If you see water leaking from the connection, the O-ring or the fitting itself may need replacement. A loose connection can cause the cleaner to lose suction and stop working. Ensure all nuts and bolts are tightened according to the manufacturer’s specifications.
Listen for unusual noises during operation. Grinding or clicking sounds often indicate worn bearings or a damaged turbine. If you hear these noises, stop the cleaner immediately and inspect the internal components. Replacing the turbine bearings can restore smooth operation and prevent further damage to the drive shaft. The drive shaft assembly is a critical component that transfers power from the turbine to the wheels.
Check the drive shaft for wear or damage. The shaft connects the turbine to the wheels and must rotate freely to move the cleaner. If the shaft is bent or stripped, it will need replacement. A damaged shaft can cause the cleaner to move erratically or not move at all. Replacing the drive shaft is a straightforward task that can be completed with basic tools.
Inspect the turbine for debris or damage. The turbine is responsible for creating the vacuum that moves the cleaner. If the turbine is clogged with debris, it will not spin freely and the cleaner will lose power. Clean the turbine thoroughly to remove any leaves, sand, or other debris. A damaged turbine blade can also cause reduced performance and should be replaced if necessary.
Verify the compatibility of replacement parts with your specific model. Not all parts are interchangeable between different Polaris models. For example, parts for the Polaris 280 may not fit the Polaris 380. Always check the model number on your cleaner before purchasing replacement parts. Using incorrect parts can lead to poor performance or further damage to the unit.
Consider the age of the cleaner when deciding whether to repair or replace. If the unit is older than five years and has multiple worn components, it may be more cost-effective to buy a new cleaner. However, if the unit is relatively new and only a few parts are worn, a rebuild kit is usually the better option. A rebuild kit can restore the cleaner to like-new condition and extend its life for several more years.
Use the correct tools for the repair. Most Polaris cleaners require basic hand tools such as screwdrivers, wrenches, and pliers. Avoid using power tools that could strip screws or damage plastic components. Work slowly and carefully to avoid losing small parts or damaging the housing. Keep all parts organized so you can reassemble the cleaner correctly.
Test the cleaner after the repair. Run the cleaner in the pool for a short period to ensure it is working properly. Check for leaks, unusual noises, or erratic movement. If the cleaner is not working as expected, re-inspect the components you replaced. It may be necessary to adjust the pressure or flow rate to achieve optimal performance.
Maintain the cleaner regularly to prevent future repairs. Rinse the cleaner and filter bag after every use to remove debris and chemicals. Store the cleaner in a cool, dry place when not in use. Check the hoses and fittings periodically for signs of wear. Regular maintenance can significantly extend the life of your pool cleaner and prevent costly repairs.
Be aware of the limitations of your pool’s plumbing system. Some pools may not have the correct plumbing for a pressure-side cleaner. If your pool only has a suction-side port, you may need to install a booster pump or use a different type of cleaner. Consult a pool professional if you are unsure about the compatibility of your plumbing system with the cleaner.
Understand the role of the booster pump in pressure-side cleaners. The booster pump provides the extra water pressure needed to move the cleaner around the pool. If the booster pump is not working correctly, the cleaner will not function properly. Check the booster pump for leaks or blockages if the cleaner is not moving as expected. A functioning booster pump is essential for the performance of a pressure-side cleaner.
Identify the specific model of your Polaris cleaner. The model number is usually located on a label on the side or bottom of the cleaner. Common models include the 280, 380, and 180. Each model has specific parts and dimensions that are not interchangeable with other models. Knowing the exact model number will help you find the correct replacement parts and avoid compatibility issues.
Check the warranty on your cleaner and replacement parts. Some rebuild kits come with a warranty that covers defects in materials and workmanship. Read the warranty terms carefully to understand what is covered and for how long. Keeping your purchase receipts and warranty documents can help you make a claim if a part fails prematurely. A good warranty can provide peace of mind and protect your investment.
Consider the environmental impact of your repair choices. Reusing and repairing pool cleaners reduces waste and conserves resources. Choose replacement parts made from durable, recyclable materials when possible. Properly dispose of old parts and packaging according to local regulations. Sustainable maintenance practices can help protect the environment and reduce your carbon footprint.
Document your repair process for future reference. Take photos of the disassembled components and note the order in which you removed them. This can help you reassemble the cleaner correctly and identify any issues in the future. Keeping a record of the parts you replaced and the date of the repair can also help you track the maintenance history of your unit.
Seek professional help if you are not comfortable performing the repair yourself. A pool service technician can diagnose and fix complex issues that may be beyond your skill level. Professional repair can save you time and prevent further damage to the cleaner. If the cleaner is under warranty, a professional repair may be required to maintain the warranty coverage.
Stay informed about common issues and solutions for Polaris pool cleaners. Online forums and manufacturer support resources can provide valuable insights and troubleshooting tips. Learning from the experiences of other pool owners can help you avoid common mistakes and make informed decisions about your repair. A well-maintained pool cleaner is a key component of a healthy and inviting swimming pool.
By following these steps, you can effectively repair your Polaris pool cleaner and restore its performance. Regular maintenance and timely repairs can extend the life of your unit and ensure consistent water clarity. Take the time to inspect and maintain your cleaner regularly to avoid unexpected breakdowns. A well-functioning pool cleaner makes pool maintenance easier and more enjoyable.




Write Your Review
No reviews yet. Be the first to share your experience!