

Routine soaking eventually saturates spa water with dissolved minerals, body oils, and chemical byproducts that regular filtration cannot remove. When water clarity drops or foaming becomes uncontrollable, knowing how to fully drain a hot tub is the most reliable way to reset your system and protect internal components. Proper evacuation clears out accumulated total dissolved solids, prevents scale accumulation on sensitive heating elements, and ensures your sanitizers perform efficiently. Pairing clean water cycles with sturdy protective patio spa covers shields the freshly balanced water from outdoor debris and thermal loss.
Draining a spa completely involves more than merely opening a bottom drain valve and walking away. Trapped water frequently lingers inside plumbing manifolds, lower jet lines, and footwells, creating stagnant pockets or risking cracked PVC pipes during freezing winter weather. Turning off power at the dedicated circuit breaker safeguards the heater element from dry-fire damage while you work. By executing a methodical drain and purge routine every three to four months, you preserve acrylic shell luster and maintain optimal hydrotherapy performance.



Complete Guide to Draining and Purging Your Hot Tub
Completely emptying a spa requires systematically evacuating several hundred gallons of water while clearing hidden plumbing lines that gravity draining leaves behind. Homeowners often struggle with murky water or chemical lock because residual waste remains trapped in lower manifold lines after an incomplete drain. Following a structured procedure protects your internal equipment, eliminates organic contamination, and simplifies refilling. Taking the time to execute each phase properly prevents air locks, protects heater elements, and restores pristine water balance.
When and Why Complete Water Evacuation Is Necessary
Spa water has a finite operational lifespan regardless of how diligently you sanitize and balance the chemistry. Every time bathers soak, dissolved solids such as perspiration, body lotions, dead skin cells, and dissolved chemical sanitizers accumulate in the water column. Over time, total dissolved solids reach a saturation threshold where chlorine or bromine can no longer sanitize effectively. Water clarity deteriorates, persistent foaming develops on the surface, and strong chemical odors emerge despite proper testing readings.
Routine water turnover also prevents cyanuric acid buildup in stabilized chlorine systems and eliminates stubborn mineral scaling on internal heating elements. Operating a hot tub with high total dissolved solids forces pumps to work harder and can cause premature corrosion on heater housings and jet bearings. A complete water evacuation every three to four months resets the baseline water profile to zero. This routine purge is essential for protecting your equipment investment and maintaining a sanitary hydrotherapy environment.
Critical Safety Preparation and Electrical Power Isolation
Safety begins by disconnecting all electrical power to the hot tub before attaching hoses or opening drain valves. Hot tub control packs continuously monitor water levels, temperature, and pressure through electronic sensors. If power remains active while the water level drops below the skimmer intake, circulation pumps can run dry, overheating the internal pump seals within minutes. More critically, electric heating elements can energize in an empty heater tube, causing catastrophic dry-fire element failure or melting plastic manifold housings.
Turn off the dedicated breaker inside the main electrical panel as well as the external emergency disconnect switch. Under National Electrical Code guidelines, outdoor hot tubs must feature a dedicated GFCI maintenance disconnect switch mounted at least five feet away from the water edge. Switching off this emergency disconnect prevents accidental power restoration while you work near wet electrical enclosures. Always verify that the topside control display goes completely blank before proceeding with any drainage steps.
Performing a Pre-Drain Plumbing Line Flush
Draining the water without first purging the internal plumbing leaves thick layers of organic biofilm adhered to interior pipe walls. Flexible PVC pipes run throughout the spa cabinet, creating complex loops where body oils, cosmetic residues, and bacteria collect over months of use. Adding a specialized plumbing line flush product before killing the power breaks down this hidden slime and suspends it in the water. Turn your hydrotherapy jets to high speed for twenty to thirty minutes to circulate the purge agent through every line.
During the purge cycle, thick brown or green foam often surfaces as the plumbing cleaner strips organic buildup from the piping. Skimming off excess surface scum or using absorbent accessories like the Hot Tub Scum Absorber, 2Pack Reusable Scum Turtle helps capture floating oils before they reattach to the acrylic shell. This reusable absorber features a 3D honeycomb mesh design that traps floating grime without harsh chemicals. Once the purge cycle finishes, immediately shut off power to begin draining before the loosened biofilm settles back onto internal plumbing surfaces.
Standard Gravity Drainage Procedures and Mechanical Constraints
Most portable spas include a factory-installed gravity drain valve located near the base of the exterior equipment cabinet. Accessing this valve typically requires sliding off an access door or unscrewing an external panel cap. Once exposed, attach a standard 5/8-inch or 3/4-inch garden hose securely to the drain threads. Run the opposite end of the hose downhill toward an appropriate drainage site such as a lawn, sewer cleanout, or storm drain permitted by local municipal regulations.
Gravity drainage is reliable and requires zero specialized machinery, but it operates under strict physical limitations. Water flow rates through a standard garden hose rarely exceed two to three gallons per minute depending on elevation drop. Draining a four-hundred-gallon spa by gravity alone often takes three to five hours. Furthermore, the drain valve cannot pull water that sits lower than its own internal plumbing port, leaving several inches of water sitting in the footwell. Specialized drain replacements, such as the VARNAHOME Stainless Steel Bath Tub Drain Assembly, provide durable stainless steel hardware for basin fittings, but standard spa gravity valves still require manual water clearance.
Rapid Drainage Using Siphons and Submersible Pumps
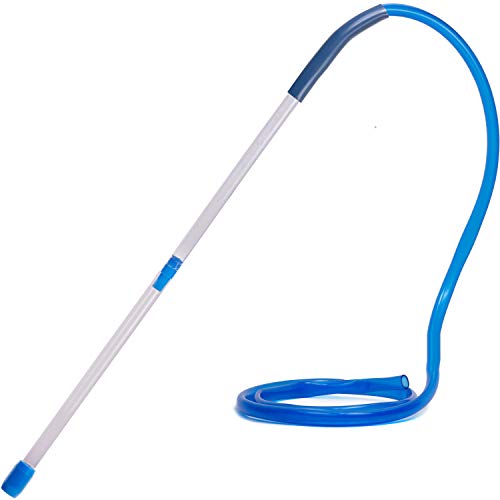
Homeowners seeking a faster turnaround can bypass the built-in valve by using high-flow siphon tools or submersible utility pumps. A siphon tool like the Backyard Innovations Quick Spa Drain utilizes gravity siphon action to move water at ten to twelve gallons per minute. This dramatic increase in velocity reduces total drain time from four hours down to roughly thirty to forty minutes. Siphon vacuums also extract fine grit, sand, and particulate debris from the spa floor as the water evacuates.
Self-starting siphon devices offer another practical alternative for above-ground hot tubs without requiring motorized pump power. The Shake-a-Vac Spa & Pool Water Vacuum operates via a shake-to-start mechanism and features an eight-foot high-flow discharge hose. Because any siphon depends on gravity, the discharge end of the hose must rest lower than the water surface of the spa to initiate and sustain flow. Placing the intake head directly into deep footwells allows you to vacuum up settled sediment while the main water column drains away.
Evacuating Hidden Water from Jets, Footwells, and Plumbing Lines
Shutting down the drain once the water stops flowing leaves gallons of dirty water trapped inside internal plumbing channels. The lower jet loops, heater manifolds, air blower lines, and footwell contours retain residual moisture that gravity cannot reach. If you refill the hot tub immediately without removing this stagnant water, old contaminants mix directly into your clean fill water. During freezing weather, this residual water creates an even greater hazard by expanding and cracking fragile PVC pipe unions.
A standard wet-dry shop vacuum is the most effective tool for clearing these hidden pockets of water. Attach the vacuum hose to the blower exhaust port and press the nozzle firmly against each upper hydrotherapy jet. The pressurized air forces trapped water through the internal manifold loops and expels it out through the lower jets into the footwell. Move systematically around the spa, opening all jet face dials and diverter valves to ensure every individual plumbing run is cleared.
After blowing out the upper jets, switch your wet-dry vacuum back to suction mode to collect the water that gathered in the footwell. Insert the vacuum hose deep into the filter canister housing to extract water sitting below the cartridge standpipes. Vacuum out the lower suction intake fittings located along the footwell floor. Removing this final volume guarantees that your tub is completely dry and prepared for shell cleaning or seasonal storage.
Acrylic Shell Cleaning and Intake Grate Maintenance
Once the water is entirely evacuated, inspect the exposed acrylic shell for scum rings, mineral scale, and surface residue. Never use household glass cleaners, bleach, or abrasive scouring pads, as these products scratch acrylic finishes and introduce persistent foaming agents. Wipe down the shell using a soft microfiber towel dampened with warm water or a specialized spa surface cleaner. Pay close attention to the waterline area where bather oils and cosmetic residues naturally collect.
Take this opportunity to inspect intake suction grates, jet nozzles, and filter housing threads. Remove any hair or fine debris caught behind the suction covers to maintain proper pump intake flow. While your spa dries, check the condition of your cover to ensure weather seals and vapor barriers remain intact. Spa owners using foldable spa cover designs should inspect hinge seams and underside vinyl for moisture retention before closing the empty shell.
Seasonal Winterization Protocols to Prevent Freeze Damage
Draining a hot tub for the winter requires additional safeguards beyond a standard seasonal water refresh. Water trapped inside pump volutes, heater barrels, or check valves will freeze into solid ice, expanding with enough force to shatter cast fittings. Access the equipment compartment behind the front cabinet panel to inspect the primary components. Loosen the threaded plumbing union nuts on both the intake and discharge sides of each pump to allow trapped water to drain out freely.
Remove the small winterizing drain plugs located at the bottom of each pump wet end and store them safely inside the cabinet. Use your wet-dry vacuum to suck residual moisture directly from the loosened heater unions and pump ports. Never add automotive ethylene glycol antifreeze into a hot tub plumbing system under any circumstances. If winterizing protection is desired, use only non-toxic propylene glycol swimming pool antifreeze approved for potable water lines.
Secure the empty cabinet firmly and fasten your insulating cover tightly to prevent rain, melting snow, and ice from entering the tub. Installing heavy duty outdoor hot tub covers protects the interior acrylic shell from extreme cold and shields dry seals from sun exposure. Fasten all tie-down safety straps to prevent strong winter winds from lifting the cover and exposing the dry shell. Inspect the cabinet vents periodically during sub-zero months to verify that rodents have not nested near the wiring harnesses.
Refilling Techniques to Prevent Circulation Pump Air Locks
Refilling a freshly drained hot tub requires a specific procedure to avoid creating pump air locks. Dropping a garden hose directly into the center of the footwell is the most common mistake made by hot tub owners. As water fills the footwell first, it rises up and traps a large bubble of air inside the plumbing manifold and pump wet ends. When power is restored, the pump impeller spins in an air pocket without moving water, triggering flow error codes on your topside control panel.
To prevent air locks, place the garden hose directly down into the empty filter canister standpipe. Filling through the filtration line forces water downward through the pump volute and heater manifold before it enters the footwell. This reverse-fill technique displaces air upward through the open jets as water levels rise inside the tub. Continue filling until the water level reaches the midpoint of the skimmer opening or the manufacturer fill line indicated on the shell.
Startup Water Balancing and Chemical Restoration
Restore electrical power at the main circuit breaker and the external emergency GFCI disconnect only after the tub is filled to the proper line. Listen closely to the circulation pump to confirm smooth water flow and verify that no low-flow error codes appear on the topside screen. Allow the fresh fill water to circulate for at least thirty minutes before testing baseline chemical levels with reliable test strips or a liquid test kit. Fresh municipal tap water or filtered well water requires systematic chemical adjustment before bathers enter.
Always balance total alkalinity first to establish an ideal buffering range between 80 and 120 parts per million. Once alkalinity stabilizes, adjust pH into the safe range of 7.2 to 7.8 before adding sanitizing agents. Incorporating conditioning treatments such as the Spa Platinum Pro Hot Tub Water Clarifier helps bind micro-particles and stabilizes fresh water clarity using natural compounds. After setting basic water parameters, introduce your primary EPA-registered sanitizer, such as chlorine or bromine, to complete the startup sequence.
Operational Verification and Maintenance Schedules
Conduct a thorough leak inspection inside the equipment cabinet while the hot tub heats up to operating temperature. Check around the pump union collars, heater split nuts, and drain valve fittings for any signs of dripping water under pressure. Establishing a disciplined drain and refill schedule every ninety to one hundred and twenty days keeps your equipment operating efficiently. Thoroughly evacuating your spa water protects your hydraulic components, extends acrylic shell life, and guarantees a pristine hydrotherapy experience every time you soak.


Write Your Review
No reviews yet. Be the first to share your experience!